Have you ever seen a woman with long hair apparently effortlessly up in an intricate style with a pencil, chopstick or more elegant stick? I always envied these women their ability to quickly create these styles, until I discovered hair sticks myself.
Hair sticks are decorative pieces of art, which really do make these styles extremely easy for anyone with shoulder-length or longer hair to create, with a little practice.
Hair sticks have a long history and have been used since ancient times. There are records of them being used by the Egyptians, Greeks and Romans. Of course, it is the Chinese and Japanese cultures which are best known for their use of hair sticks.
During the 1920s, hair sticks became more widely used in the West. Today, they remain a classic way to style long hair; they will never be out of fashion. Hair sticks today are made from wood, bone or metal, and choice of material is largely a personal preference. The tops may simply be carved into a design, or decorated with beads or dangles. There is a hair stick for every occasion, from designs suitable for casual, everyday wear to those for office wear, special occasions and formal events.
Wednesday, July 30, 2008
What Are Hair Sticks?
Labels: art for hair, etsy, hair sticks, hairsticks, long hair, long hair styles, squidetsians, team squidetsy, what are hairsticks
Posted by Art for Hair at 10:27 AM 0 comments
Sunday, July 27, 2008
Tutorial: Drawing Abstract Designs

A few people have asked me how to make something like this piece, Abstractions, that I sell in my etsy shop, so I've decided to put together a brief tutorial on the process (but if you like this piece, I hope you'll buy mine along with trying out your own--in fact, if you contact me on etsy and mention this tutorial, I will give you 15% off the sale price on any print in my shop).
Tools you'll need:
Pen (archival ink is a must if you want your original to last; use black ink or whatever color you want your border to be)
Paper (if you want a higher quality drawing, use acid-free art paper suited to your medium)
Optional:
Colored pencils, multicolored inks, or paint (for adding additional color to your piece)
Scanner (for creating a digital image of your drawing to work with on the computer)
Digital image editing software (I use photoshop, but you can get "gimp" for free online) Step 1:
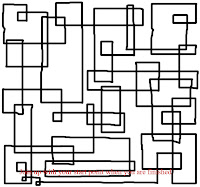
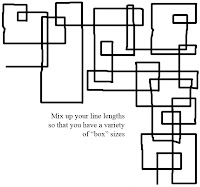
Pick a starting point near the lower right corner edge and draw a line parallel to the right side of the page. Make a "right turn" and continue your line. Keep doing this with different line lengths.
Tip: Make sure you are always turning in the same direction.
Step 2:
Continue this process, staying somewhat close to the right side of the page, until you approach the upper right corner. I find it looks best to arrange your turns so you can go parallel to the corner edge.
Tip: Don't actually touch the edges of your paper.
Steps 3&4:


Step 5:
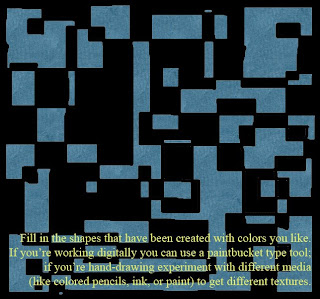
Now for the fun part--filling in the design. You'll notice that all four edges of your piece are white. Fill all of this in with one color--I usually pick black. Then take this same color and fill in all the shapes you've created that share a diagonal corner with this border.
 Once you've done this, you can either fill all the other boxes with another single color--as I've done in the tutorial image--or, for more of a challenge, you can fill them in with related colors in a pattern, as I did in my different versions of the "Abstractions" piece shown at the beginning.
That's it--congratualtions! You can add some variety by playing around with different media--colored pencils will add a different texture to your final image, for example, like it has in my ACEO Not Quite Home, and you'll find that ink and paint can also have interesting effects. If you have digital image editing software and a scanner, you can also create a digital version of your drawing and fill in the colors on the computer, which gives you a safe way to experiment with different color combinations.
Labels: abstract art, abstractions, art tutorial, coupon, discount, DIY, drawing advice, drawing tutorial, etsy, fun designs, how to draw, not quite home, purrprints, sale, squidetsians, team squidetsy
Posted by PurrPrints at 11:24 AM 0 comments
Friday, July 25, 2008
Welcome to the Team SquidEtsy Blog!
Welcome to the SquidEtsians blog, and thank you for your visit! This blog is a group effort by members of Etsy's SquidEtsy Street Team.
Etsy is the premier online marketplace for handmade items. Thousands of artists and craftspeople have Etsy store fronts, and buyers can find everything from clothing to soap and jewelery to paintings, with the added bonus that everything has been hand-made by individuals and small businesses with care and attention to detail. Etsy sellers join groups called Street Teams, which unite crafters with a common interest. Members support each other in raising the profile of their individual Etsy shops and artistic endeavors. Team SquidEtsy is a group of Etsy artists and craftspeople who use Squidoo 'lenses' to promote their work. Squidoo is a site where anyone can create a page, known as a lens, about any subject they like. Other Squidoo members can leave comments and rate lenses, and lenses are ranked in Squidoo.
This blog will feature:
- profiles of team members and their work
- DIY instructions for various crafts
- details about new items in member's shops
- details of sales and special offers from member's shops
- selections of items suitable for occasions such as Christmas, birthdays, graduations etc
We're just getting started, check back soon!
Labels: buy handmade, etsy, etsy street team, squidoo, team squidetsy
Posted by Art for Hair at 10:21 AM 1 comments
